Jump to a Topic
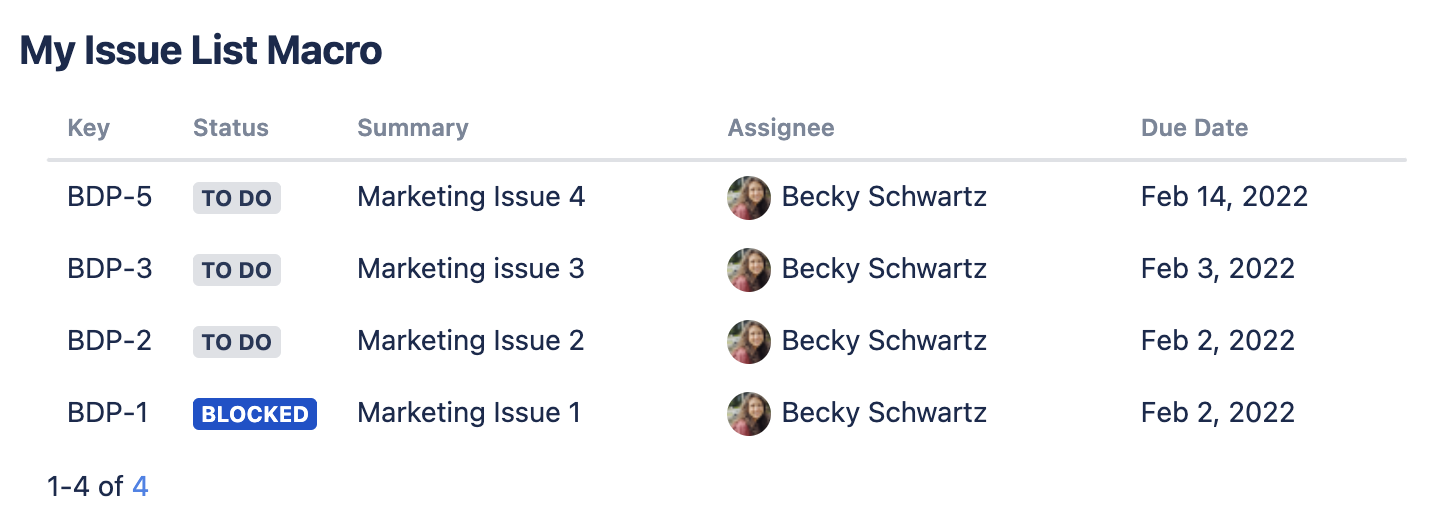
What is the Issue List macro?
Issue List is a new Custom Charts macro that allows users to generate a list of Jira issues on their Confluence page.
Adding the Issue List Macro to a Page
Custom Charts Issue List is a separate macro from the Custom Charts macro and the Custom Charts Simple Search macro. To add it to your page:
Edit your Confluence page by typing “e” on your keyboard, or, by clicking the pencil icon at the top of your Confluence page
Type “/” on your keyboard or click the + dropdown in the page header and search for Custom Charts. Select Custom Jira Charts - Issue List
In the pop-up, adjust the following settings to customize the Issue List:
Source: Controls the Jira issues that appear in the Issue List
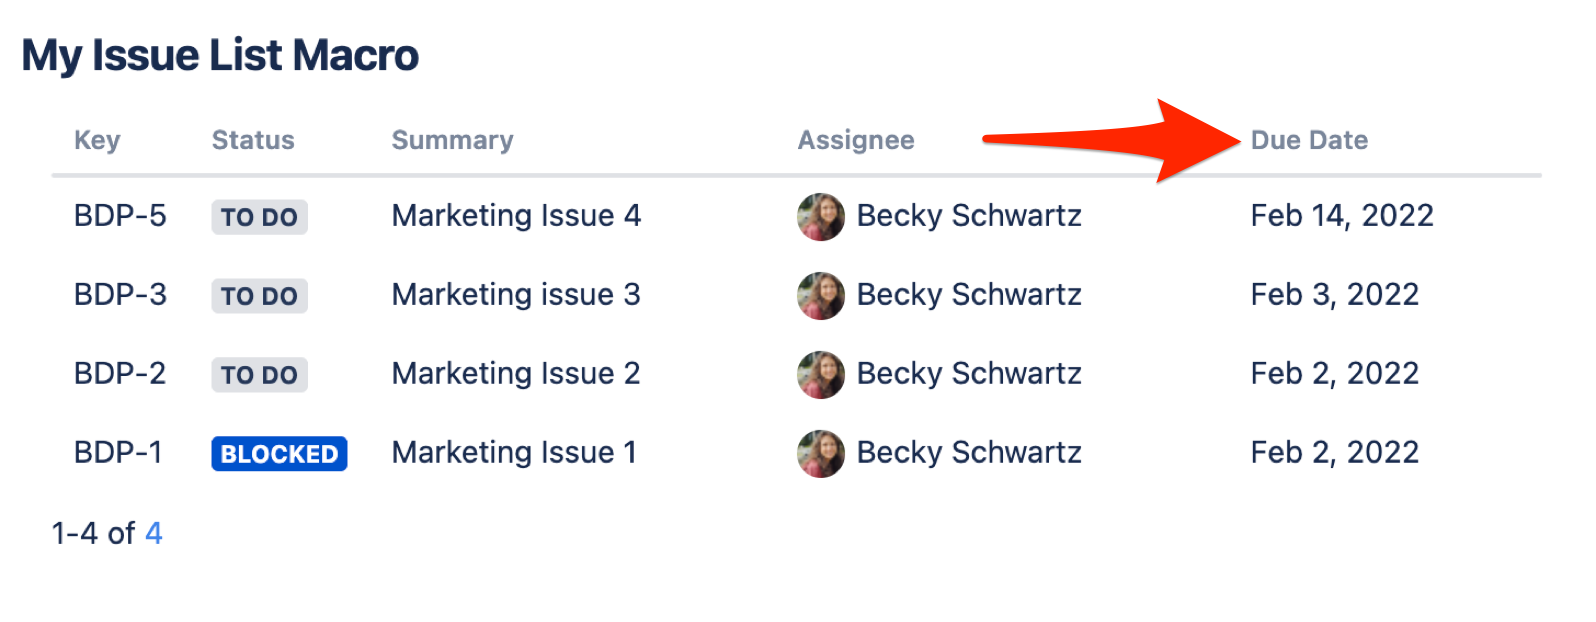
Columns: Controls the fields that appear for each Jira issue in the Issue List. Fields will appear as separate columns on the Issue List (similar to their appearance in the Issue Navigator in Jira)
Fields will be selected by default, but you can add additional fields by clicking + Add Another Field at the bottom of the list of fields
Setting up Issue List
To see how your configuration will look once the macro is published, use the Live Preview on the left side of the Editor
Source
The Source controls the Jira issues that appear in the Issue List macro.
.gif?version=2&modificationDate=1644423294318&cacheVersion=1&api=v2&width=557&height=317)
Projects: allows you to choose specific Jira project(s) to pull issues in from
Saved filters: allows you to pull in issues based off any Jira filters you’ve already created
Advanced (JQL): allows you to pull in issues based off custom JQL written directly within the macro
Simple Search macro: allows you pull in issues based of criteria set in a Simple Search macro - ⚠ you must have already inserted and customized the Simple Search macro on the page for it to be an available option
Columns
Columns control the fields that appear for each Jira issue in the Issue List. Fields will appear as separate columns on the Issue List (similar to their appearance in the Issue Navigator in Jira). Jira system fields and custom fields can be added, including 3rd party application fields (full list of integrations here).
Adding Fields (Columns)
.gif?version=2&modificationDate=1644423319994&cacheVersion=1&api=v2&width=557&height=316)
Once in Edit mode in the macro, navigate to the Columns section on the right. At the bottom of the “Columns” section, click + Add another field
In the “Select field” dropdown, type the name of the Jira field you wish to add. Click the field to add it to your chart and see it in the Live Preview on the left
Click Save, then publish your Confluence page. The field will be added as a new column in the macro.
Removing Fields

Once in Edit mode in the macro, navigate to the Columns section on the right. Find the name of the field you want to remove
To the far right of the field, click the trash can icon
Click Save to lock in your changes
Republish the page and the field no longer appears in the macro
Renaming Fields
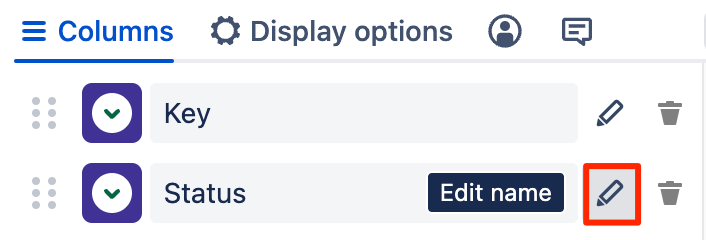
Once in Edit mode in the macro, navigate to the Columns section on the right. Find the name of the field you want to rename
To the far right of the field, click the pencil icon and type in the name you want to be shown for the column
Click Save to lock in your changes
Republish the page and the field displays with the new name
Issue List Display Options

Chart options
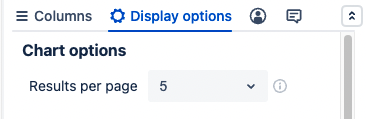
Results per page dropdown: Adjusts the amount of issues that appear on each page of the Issue List macro
Start your 30-day free trial of Custom Charts for Jira from the Atlassian Marketplace or directly on your Jira instance.
What’s on this page?
Get a trial license from the Atlassian Marketplace

Go to the Custom Charts marketplace listing and choose your desired hosting type from the dropdown.
Click the Try it free button and follow Atlassian’s steps in the pop-up window to activate your trial license.
You must have the Jira System Administrators global permission to activate your trial. In case you are not an admin, you can request the app using Atlassian Marketplace’s functionality. Your Jira instance administrator will receive an installation request and enable it for you.
Install directly on your Jira Cloud instance
Login to Jira Cloud as an Administrator
.png?version=1&modificationDate=1670434646534&cacheVersion=1&api=v2&width=312&height=455)
In the top navigation bar, click Apps, Explore more apps

On the Explore Apps page, type Custom Charts for Jira in the Search bar

Click the tile for Custom Charts

On the Custom Charts app page, click Try it free

In the pop-up window, click Start free trial to initialize the installation

Install directly on your Jira Server / Data Center instance

Log into your Jira Cloud as an administrator
In the top right corner of Jira, click the gear icon → Manage apps. This will take you to the Find new apps section of Jira’s Admin settings

In the app search bar, type Custom Charts and hit Enter/Return on your keyboard

In the Custom Charts app section that appears, click Install

In the installation pop-up, click Accept & Install
